You can modify a point by changing its position or by changing its properties. The properties of a point include name, description and reference system.
Related commands:
•
Procedure: Change Point Position
1. In the Layers window, select the layer displaying reference model point features.
In order to select reference model features other than templates, you must have a layer that includes the desired feature type(s) in its display filter. |
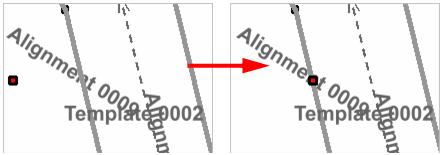
2. Click a point in the reference model and keep the mouse button pressed.
The mouse pointer changes to indicate the point is ready to be modified.
3. Drag the point to a different position.
4. Release the mouse button to place the point.
The attributes for the point are updated. To view updates to the point, select the Coordinates window.
5. [Optional] To position the point more precisely, double-click the appropriate field (Chain, Offset) and type a new value.
6. To accept the updated value for the point, press <Enter>.
The point is shown in its new position in the Display window.
Procedure: Change Point Properties
1. In the Display window, superselect a point feature.
The selected point becomes the active model feature and the Model Feature window is populated with information for the point. The Identification tab is selected by default.
In this tab you can specify a custom name for the point and enter a description.
2. [Optional] Type a name for the point in the Name field and press <Enter>.
3. [Optional] Type a description of the point feature in the Description field and press <Enter>.
4. Select the Spatial tab.
The Spatial tab is displayed.
In this tab you can associate the point with a reference system. The default reference system for a point is the origin (0, 0). If an alignment was selected at the time the point was created, the alignment would be the default reference system.
5. [Optional] Select an option from the Reference system drop-down list.
6. Click Apply.
The properties are updated.