Menu | Tools > Features > Create Features Inside Contours > Superselection/Selection |
Similar to the Quick Creator command, the Create Features Inside Contours command allows users to manually create features or designate soundings using the existing values in an area. Instead of using a cursor-defined area, the application analyzes the data within enclosed contours and creates features or designates soundings based on user-defined criteria. This tool is useful for identifying areas where there is an unidentified difference in depth or height in relation to the areas surrounding the contours.
Related commands:
• Create Features from Selection
Interface
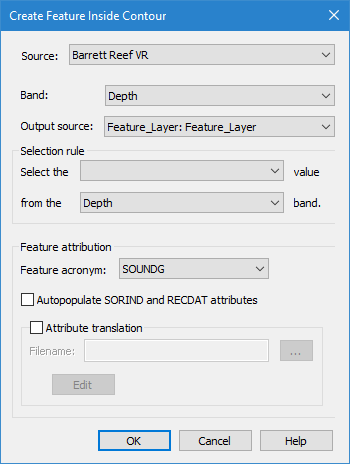
The Create Features Inside Contours command uses the following dialog box.
Option | Description |
Source | The Source is defined by the surface that was selected at the time the command was initiated. This field cannot be changed. |
Band | The band from which Z-values will be read for the designated soundings or new features. |
Output source | This field controls which function will be performed and where new features will be created. • If you choose a feature layer, new soundings or point features will be created on the selected layer. • If you choose a Designated band in a surface, soundings from the input band will be flagged as designated. The Designated band of the current surface is selected by default. If the current surface does not have a Designated band, but the Designated option is selected, the band will be created in the surface when you click OK on the dialog box. Designated soundings can only be created from the primary elevation band of the source dataset. If creating designated soundings and the Source is anything other than the primary elevation band of the dataset, an error message will be displayed when the process is run. |
Selection rule | The Selection rule fields define how soundings will be selected for the designation or creation when an area is analyzed. 1. In the first drop-down list, select Deepest or Shoalest to define whether the command should look for the deepest or the shoalest value in the selected area. 2. In the second drop-down list, select the band of the surface from which data will be collected. Only bands of the selected surface are available. |
Feature acronym | The Feature attribution fields allow you to define the type of features to create and metadata values to assign to the features. If you do not wish to create features or populate attributes, these fields do not need to be populated and will be disabled if a Designated band is selected as the Output source. The feature type of the new features is controlled by the Feature acronym field. The drop-down list for this field is populated according to the feature catalogue of the selected Output source. The default selection will be the first sounding type feature in that catalogue. |
Autopopulate SORIND and RECDAT attributes | The source (SORIND) and date (RECDAT) attribute values for the new features are populated automatically if this option is enabled. |
Attribute translation | This option allows a translation file (.bsst) to be applied to the data to map attribute values. You can choose to use an existing translation file or create a new one. 1. Click the check box to enable this option and its related fields. |
Filename | The BSST translation file to use for attribute mapping. An existing file can be used or a new file can be created. 1. Click the browse button (...) to open or create a file. 2. To select a file either: • select an existing file by navigating to the file and clicking Open, or • create a new file by navigating to the location in which to store the file, entering a name for the file in the File name field and clicking Open. |
Edit | Launch the Edit Translation File tool to edit the settings of the selected translation file. If a new file is being used, this tool is used to define the settings of the new file. See Edit Translation File for more details on this tool. |
Procedure
1. If creating features, open or create a feature layer.
2. In the Layers window, select the layer containing the contour features.
3. In the Display window, select the contours for which you want to create features/designate soundings.
4. Select the relevant Create Features Inside Contours command based on your selection.
5. Select the surface to use as the Source data for the process.
6. Select the Band from which data values will be used.
7. Select an Output source.
8. In the Selection rule section, choose whether the command should look for the Deepest or the Shoalest values.
9. Select the band of the surface from which data will be collected.
10. Select the Feature acronym of the desired feature type from the drop‑down list.
11. Define any other necessary options.
12. Click OK to create features or designate soundings.