A feature is edited using the Edit Feature command. When this command is active, area and line features are shown with yellow squares representing the vertices and nodes.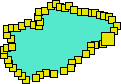
A feature is edited using the Edit Feature command. When this command is active, area and line features are shown with yellow squares representing the vertices and nodes.
A node is the point where two edges meet. A node is represented as a large yellow square.
Point features have a single yellow square, representing the actual position of the point.
Editing of a line or area typically involves changing the shape of the feature by adding, moving, or otherwise modifying vertices.
When a vertex is selected, it turns red. You can select single or multiple vertices.
When you edit a feature, it is locked to prevent other users from editing it at the same time. The feature remains locked until you save it, reload the workspace, or end the current session.
If you try to edit a feature that is locked by another user, a message informs you that the feature is not available for editing. You will have to wait until the feature is available.
Some features share some of their geometry with other features. To apply changes to all features that share the geometry, the Edit All Features command must be active. If editing would result in invalid geometry or if the changes could not be shared unambiguously, the shared features might not be edited. |
The following editing can be performed:
You can also use the Coordinates window to move vertices and point features. See Coordinates Window.
Keyboard Shortcuts
The following keyboard shortcuts can be used when editing features:
Key | Purpose | Mode |
Ctrl+Click | Add a vertex on an edge if the cursor is over the edge segment. | Edit |
Ctrl+Z | Undo the most recent action. | Edit |
Enter | Process a change to an edge (for example, when redigitizing an edge segment). | Edit |
Ctrl+E | For an existing and selected digitized feature, enter or exit editing mode. | Edit |
Delete | Delete a vertex. | Edit |
F | Filter selected vertices. | Edit |
M | Merge an edge at a selected vertex. | Edit |
O | Smooth an edge. | Edit |
P | Spatial split at a selected vertex. | Edit |
R | Redigitize selected vertices. | Edit |
S | If manual snapping is enabled, pressing <S> snaps the cursor to the nearest node. To cycle through the multiple vertices, if applicable, press <Space>. | Digitize Edit |
Space | Toggle between vertices when using snapping. | Edit |
The following keyboard shortcuts can be used to select vertices.
Key | Description |
Home | Select the first vertex in a line. |
End | Select the last vertex in a line. |
Shift+Home | Select all vertices from the selected vertex to the start of the line. |
Shift+End | Select all vertices from the selected vertex to the last vertex. |
Down Arrow/Right Arrow | Move the selection forward one vertex. |
Up Arrow/Left Arrow | Move the selection back one vertex. |
Shift+Down Arrow/Right Arrow | Move the selection forward one vertex adding to the selection. |
Shift+Up Arrow/Left Arrow | Move the selection back one vertex adding to the selection. |
General procedure
1. Superselect the feature.
2. Select the Edit Feature command.
Menu | Edit > Feature |
Tool |
|
Key | <Ctrl+E> |
The vertices of the feature are displayed.
3. Edit the feature.
4. Select the Edit Feature command again.
The changes are applied to the feature.
To view the changes, select the Refresh command.
To commit the changes, select the Save command.
