Pop-up | Line Digitizer > Arc [2 points + direction] |
Use with the Create Line Feature command only.
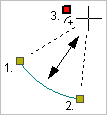
Digitize an arc by specifying the start and end point plus the centre point. The position of the arc is controlled by the direction in which the first two points are added.
Related commands:
Procedure
1. Choose the Digitize Arc Using Two Points and a Direction command.
2. Click at the start point of the arc (1).
3. Click at the end point of the arc (2).
4. Press and hold the left mouse button.
5. Drag the cursor until the arc is the appropriate shape and length.
This third point represents the centre and moving it changes the shape of the arc but not the position of the first two points. Note that the arc is restricted to one side of the first two points. The side on which the arc is placed depends on the direction of the first two points.
6. Release the mouse button (3).
You can click directly on point 3 but pressing and dragging will give you a preview of the arc. |
The arc is created.