Menu | Tools > Surfaces > New > Mosaic |
Create a mosaic by combining layers from two or more raster layers of the same type into one band. The mosaic that is created can be saved using the File > Save As command.
Interface
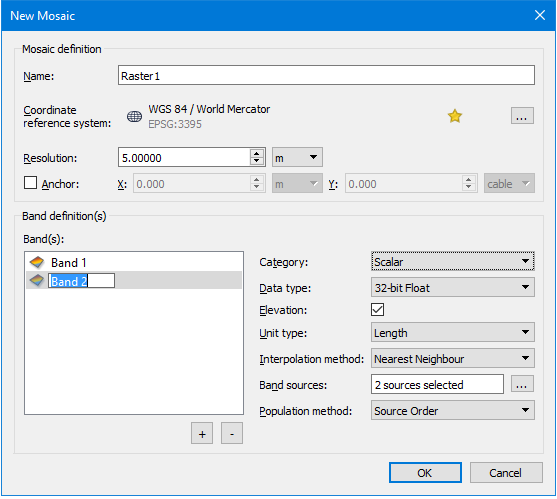
The New Mosaic command uses the following dialog box.
Options | Description |
Name | The name to assign to the new raster mosaic. |
Coordinate Reference System | The coordinate reference system (CRS) of the new raster mosaic. 1. Click the browse button (...) to launch the Select Coordinate Reference System dialog box. See Change Coordinate Reference System for information on this tool. 2. Select a CRS and click OK. |
Resolution | The resolution of the new raster mosaic. 1. Either enter a value manually or use the Up and Down Arrow buttons to select a value. 2. Select a unit of measure from the drop-down list. |
Anchor | The resolution with which to align the grid for the new mosaic raster. If this option is not enabled, the default lower-left corner will be used. 1. Click the Anchor check box to enable the option. 2. Enter the coordinates in the X and Y fields and specify a unit of measure for each coordinate. |
Bands | An output band (Band 1) is created by default and displayed in the Band(s) list. 1. Click the 2. Double -click on a band name to rename it. 3. Drag and drop bands by name to change the order in which they will appear on the output raster mosaic. |
Category | This field defined the band that will be created in the output raster mosaic. 1. Select Colour, Scaler, Date, Time, or Date and Time. |
Data type | The format that the data in the band is stored as. This field is activated when Colour or Scalar is set as category. Colour category uses RGBA as data type. 1. Select the specific data type for Scalar from the list, e.g., 32-bit float. |
Unit type | Sets the type of units in the band. The band will only contain data defined in the specified type of units. This field is only activated if Scalar is set as the category. 1. Select a unit type. |
Contains elevations | Set to True by default to store elevation data for an elevation type band, defined by a Z-axis direction. This field is only enabled for Scalar. |
Interpolation method | The interpolation method applied to populate the band values when re-sampling is necessary due to varying resolutions of the input sources. If Colour is set as category, Bilinear is the available option. 1. Select an interpolation method for another of the categories. Nearest Neighbour is set as default. |
Band sources | 1. Click the Browse button to open the Select Band Sources dialog box. 2. Select the sources to be used to populate the band values. 3. Click OK to return to the New Mosaic dialog box. The field will report the number of sources selected. |
Population method | The method to determine which of the nodes from the selected input bands will be used for the relevant node of the output raster. If Colour is set as the category, Alpha Blending is the only method available. For other categories, select either: Source Order (default), or Minimum or Maximum if the output band is an elevation band. |
Select Band Sources
The Select Band Sources dialog box lists the open raster bands that are of the same category and Unit Type as the band selected in the New Mosaic dialog box.
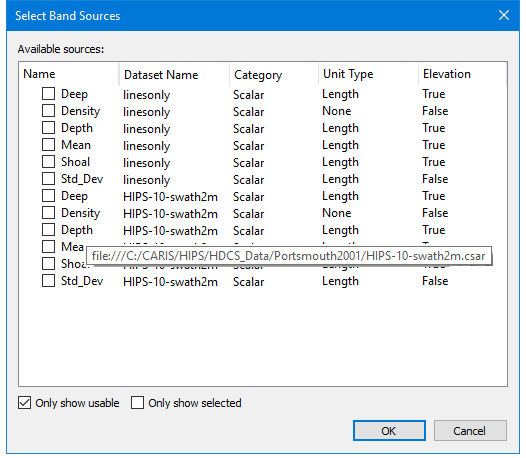
The dialog box displays all open raster bands that are of the selected band category, in this case Scalar was selected. The order of the bands listed here can be changed by dragging and dropping. The path to each band is displayed as a screen tip.
Bands selected here and their order will be remembered when the dialog box is reopened.
Procedure
1. Open two surfaces in HIPS and SIPS.
2. Select the New (raster) Mosaic command.
The New Mosaic dialog box is displayed.
3. Type a name for the new mosaic.
4. Set a coordinate reference system for the new mosaic.
5. Set resolution for the mosaic.
6. Set anchor values.
7. Add bands and define each to include in the new mosaic.
8. Click OK.
The raster mosaic will be displayed.
9. Select the new mosaic in the Layers window and select File > Save As to save the mosaic.
 button to add another band name. (Click
  to remove a selected band from the list.