To modify the properties of an alignment in the Model Feature window, perform the following steps:
1. In the Model window, select the alignment feature you want to modify, or superselect the alignment in the Display window.
The selected alignment is now the active reference model feature and the Model Feature window is populated with information for the alignment.
2. In the Model Feature window, select the Spatial tab.
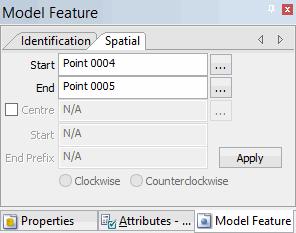
A straight alignment
The Spatial tab of the Model Feature window is displayed.
If you selected a straight alignment, the Start and End fields are populated with the start and end points of the alignment.
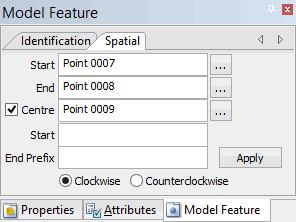
A curved alignment
If you selected a curved alignment, the Centre point feature field is active. The Start, End Prefix, and Clockwise/Counterclockwise options are only active for curved alignments (i.e., when the Centre checkbox is checked).
The spatial properties of an alignment can only be modified if they are not part of a compound alignment or another feature. |
3. To specify another point for the start or end position of the alignment, click the Browse button (...) and select a new point from the Alignment Start dialog box.
4. [Optional] To specify another point for the centre (Centre option selected), click the Centre Browse button (...) and select a new point from the Alignment Centre dialog box.
5. [Optional] To modify the Start (prefix) or End Prefix, select the field and type a new prefix value.
6. To change alignment direction, select the Clockwise or
Counter-clockwise option.
7. To confirm your changes, click Apply.
A compound alignment
If a compound alignment is selected, the Spatial tab shows the following properties:

The alignments used to create the compound alignment are displayed in the Alignments list.
1. [Optional] To remove an alignment from the compound alignment, select an alignment from the list and click Remove.
The Remove button is inactive (greyed out) if the selected alignment is the only remaining alignment in the compound alignment. |
2. [Optional] To add another alignment to the compound alignment, click Add to launch the Feature Selection dialog box and select the connected alignment to add.
The alignment is updated with any changes. To save your changes, select the Save command.