Create a raster mosaic using bands from one or more raster surfaces. The contributing bands can be from any raster surface open in the application - either open from a file or from a BDB Server database.
A raster mosaic can contain multiple bands and each band can be a combination of multiple input bands from different raster surfaces.
When multiple bands contribute to a single mosaic band, a simple combine procedure is used to merge the input bands into the output band. This process uses one of three available conflict-resolution rules when there are overlaps in the data:
• Minimum: the nodes of the contributing bands are compared and the nodes with the smallest values are included in the mosaic band.
• Maximum: the nodes of the contributing bands are compared and the nodes with the greatest values are included in the mosaic band.
• Source Order: the nodes of the contributing bands are examined based on the order that they are listed in the Select Band Sources dialog box, starting with the band at the top of the list, and the first band to contain a value for each node is used for the mosaic band.
Raster mosaics are created as temporary datasets. Temporary datasets are lost when the layer is closed or you exit the application. If the mosaic is to be kept for future use, it can be saved using the Save As command.
Interface
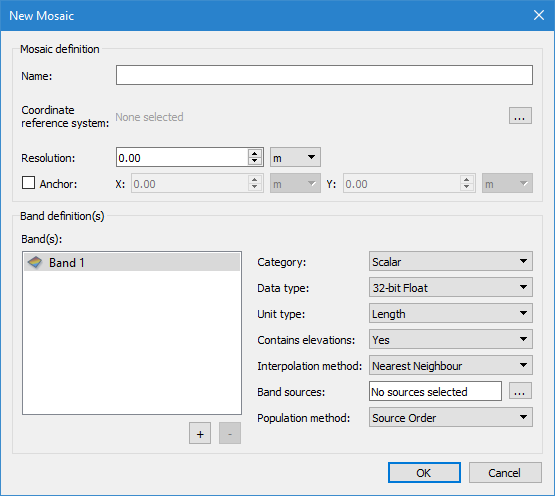
The New Mosaic command uses the following dialog box.
Options | Description |
Name | The name to assign to the new raster mosaic. |
Coordinate Reference System | The coordinate reference system (CRS) of the new raster mosaic. 1. Click the browse button (...) to launch the Select Coordinate Reference System dialog box. See Change Coordinate Reference System for information on this tool. 2. Select a CRS and click OK. |
Resolution | The resolution of the new raster mosaic. 1. Either enter a value manually or use the Up and Down Arrow buttons to select a value. 2. Select a unit of measure from the drop-down list. |
Anchor | The resolution with which to align the grid for the new mosaic raster. If this option is not enabled, the default lower-left corner will be used. 1. Click the Anchor check box to enable the option. 2. Enter the coordinates in the X and Y fields and specify a unit of measure for each coordinate. |
Bands | The Band definition fields are used to define the bands that will be present in the resulting raster mosaic. The Band(s) list contains the bands that have been selected for inclusion and is used to enter names for the bands. By default, Band 1 is displayed and selected for the settings to be defined. • To change the name of a band, double-click the band name in the list and type a new name. • To add additional bands, click the plus button (+) below the list. • To remove a band, select the band in the list and click the minus button (-) below the list. For each band you add, you must define the settings for the band using the fields to the right of the list. Changes to the settings will be applied to whichever band is currently selected in the list. |
Category | The type of band to create in the raster mosaic. All input bands contributing to the mosaic band must contain data in the format of the selected category. |
Data type | The format with which the data will be stored in the output band. This option is only enabled if |
Elevation | Identify whether the band will contain elevation data. This option is only enabled if Category is set to • Yes: Select this option if the band does contain elevation data. • No: Select this option if the band does not contain elevation data. • Yes (Primary elevation band): Select this option if the band contains elevation data and it will be the primary elevation band for the mosaic. If the primary elevation band option is selected, it will not be available for any other bands configured for the current mosaic. |
Unit type | The type of unit of the data in the band. Only data of the selected unit type will be included in the band. This option is only enabled if |
Interpolation method | The interpolation method to be used if resampling is necessary when populating a mosaic band, through warping or interpolating, to reconcile differences between input bands and the output mosaic. |
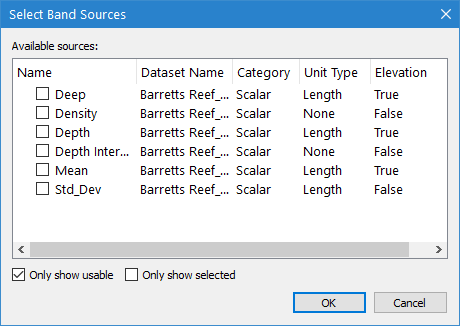
Band sources | A mosaic band can be created from a single input band or multiple input bands. This field lists the attribute bands selected as contributors for the currently selected mosaic band. It is also used to launch the Select Band Sources dialog box, which is used to select the contributor bands. The list of Available sources in the Select Band Sources dialog box includes all bands in all datasets open when the command was launched. At the bottom of the dialog box are two check boxes for display options for the list. • Only show usable: Enable this option to only display bands that are of the correct data type and unit type for inclusion in the mosaic band. Bands that are not appropriate will not be displayed. • Only show selected: Enable this option to only display bands that have been selected for inclusion in the mosaic band. This useful for ordering the selected bands. Each band selected in this list will be included as a contributor in the single mosaic band. Once bands are selected, you can use the click-and-drag method to organize the bands according to priority. This is necessary if the Source Order conflict‑resolution rule is being used. It is recommended that you enable Only show selected if reordering the bands. |
Population method | The rule to use when resolving conflicts where there is overlapping data from multiple input bands. |
Procedure
1. Open all raster surfaces that will contribute to the raster mosaic.
2. Select the New Mosaic command.
The New Mosaic dialog box is displayed.
3. Enter a name for the raster mosaic in the Name field.
4. Click the Coordinate reference system browse button (...) to launch the Select Coordinate Reference System tool and select a CRS.
5. Specify a Resolution for the raster mosaic either by manually typing a value or by selecting a value using the Up and Down arrow buttons.
6. Select a unit of measure from the drop-down list for the resolution.
7. [Optional] Click the Anchor check box to enable the option.
8. [Optional] Specify the X and Y coordinate with which to align the raster mosaic.
9. [Optional] Select a unit of measure from the drop-down list for each coordinate.
10. Double-click Band 1 in the list and enter an appropriate name for the band.
11. Select a Category from the drop-down list.
12. Select a Data type from the drop-down list.
13. Select an option from the Contains elevations drop-down list.
14. Select a Unit type from the drop-down list.
15. Select an Interpolation method from the drop-down list.
16. Click the Band sources browse button (...) to launch the Select Band Sources dialog box.
17. Click the check box for each band you want to use as an input band.
18. Change the order of the bands in the list as needed.
19. Click OK to return to the New Mosaic dialog box.
20. Select a Population method from the drop-down list.
21. Click the plus button (+) and repeat the process for all bands to be included in the mosaic.
22. Click OK.
A new temporary dataset is created and added to the Layers window. The dataset will contain all of the layers that were defined for the raster mosaic. The Properties window provides all of the same properties that are available for the source surfaces. If the mosaic is to be kept for future use, it must be saved.
23. [Optional] Select the Save As command to save the raster mosaic to a raster CSAR file.