Menu | Tools > Register |
Registration assigns georeferencing information to images or vector files by transforming an unregistered image to align to a registered one. This is done by selecting control points on the unregistered file and matching them to the corresponding locations on the registered file.
Several types of transformation can be applied:
Transformation Type | Description |
Affine | The affine transformation (or 1st order polynomial) is a six parameter transformation. It accounts for rotation in X and Y, shift in X and Y and differential scaling in X and Y. The affine transformation is useful in registering all types of raster imagery and vector data, though the results may not be as good as when using a higher order polynomial. |
Similarity | The similarity transformation is two-dimensional. Similarity transformations are conformal (that is, angles are preserved between intersecting linear features) and account for rotation in X and Y, shift in X and Y and scale. The similarity transformation is useful for registering files which were digitized from media with little distortion, such as mylar, or where the distortion is uniform throughout. |
Polynomial | The higher order polynomials are useful in registering vector data with varying localized distortions. The greater the local distortions, the higher the polynomial order (degree) to be used. The higher the order of the polynomial, the greater the amount of computer time required to register the image. |
The registered geographic coordinates (control points) for the image or vector file are stored in an XML file. This is in the same location as the file or and has the same file name with the extension .rxl. If necessary, files can be re-registered with the new control points overwriting the old ones.
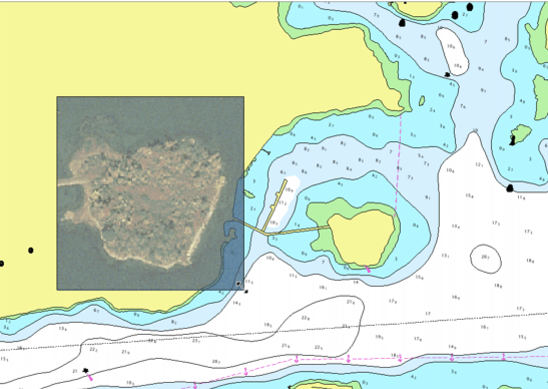
Registration of images and vector data follows the same process. The process is described here using an unregistered raster file: a TIFF image.
Procedure
1. Open the external TIFF file and select the layer.
If a non-registered image is opened, it is displayed so that the width of the image is at 50 percent of the current view, in the centre of the display. |
2. Select the Register command.
The image becomes partially transparent.
First, resize or reposition the image to manoeuvre it closer to the area from which you want to gather control points
3. Do one of the following:
• Resize by dragging the edges of the image.
• Reposition by dragging within the image.
As necessary, alternate between the zoom and selection commands to move the image to the correct position.
Once the image is in position, define the control points.
4. Select the transformation type.
Pop-up | Transaction Type > |
The minimum number of control points used to register a file depends on the transformation type.
Transformation | Minimum Number of Points |
Affine | 3 |
Similarity | 3 |
Polynomial 2nd Order | 6 |
Polynomial 3rd Order | 10 |
Polynomial 4th Order | 15 |
Polynomial 5th Order | 21 |
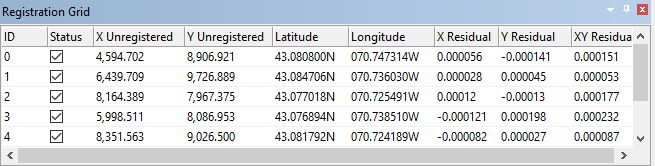
Control points are pairs of points. The source point defines a location on the unregistered file. The target point defines the same location on the registered file.
Select the control points as follows.
5. Select the Add Control Points command.
Pop-up | Add Control Points |
The cursor changes  .
.
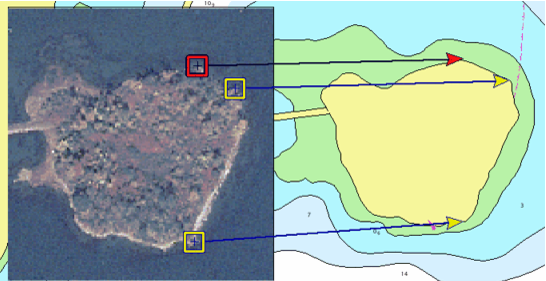
First, identify a location that is easily recognizable on both files.
6. Click at that location on the image.
A yellow box is displayed at the source position.
7. Click on the same location on the registered file.
A yellow arrow is displayed at the target position. A line is stretched between the two. These two points define a single control point.
Control points are listed in the Registration Grid as they are added.
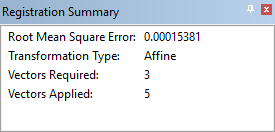
The process is displayed in the Registration Summary window.
Edit control points
You can edit control points at any time during registration.
Edit the coordinates in the Registration Grid:
8. [Optional] Do one of the following:
• Click in the cell containing the coordinate value, type a new value and press <Enter>.
• Use the commands in the pop-up menu.
Edit using one of these keyboard commands:
Key | Description |
Delete | Delete selected control points. |
Backspace | Remove the last inserted control points. |
Enter | Complete the registration process. |
Space | Toggle between moving and resizing the image and inserting control points. |
S | Snap to vector data when moving a point. |
Esc | Cancel an operation or escape the registration process. |
Edit in the Display window:
9. Select a control point and move the source point, the target point, or both.
10. Repeat adding and editing points until all points are entered.
The screen should look something like this.
When all control points have been added:
11. Select the Apply command.
Pop-up | Apply |
The results are displayed in the Output window. The Registration Grid and Registration Summary are closed.
Residual values reveal discrepancies in the control points and help identify points that are off-position. Residuals are shown as decimal degrees regardless of the settings in Options.
If the residual values within a column are similar then the target positions are fairly accurate. A wide difference between one or more values suggests that the registration is not accurate.
Registration using the Registration Grid
You can use the Registration Grid to enter or edit coordinates for the control points.
1. Click the Latitude Registered and Longitude Registered cells to highlight the values.
If you are using ground coordinates, the cells are called X Registered and Y Registered.
2. Type the new coordinate values and press Enter.
The arrow is centred on the coordinate values.
Change the Registered Coordinate Reference System
The coordinate system now registered to the file can be changed later, if needed, using the Coordinate Reference System property. Changing this property will update the _rxl file associated with this file and the selected coordinate system will be used any time the file is opened in the future.
To change the coordinate system registered to the file:
1. Select the parent layer of the file in the Layers window.
2. Selected the Coordinate Reference System property in the Properties window and click the browse button (...).
3. Select a new coordinate system and click OK.
The file is now registered to the new coordinate system.