Menu | Tools > Editors >ASCII Info File |
Tool |
|
Menu | Tools > Editors >ASCII Info File |
Tool |
|
The ASCII Info File Editor is used to create and edit format information files. Format information files are XML files that contain the position and attribute information for an ASCII dataset being imported into BASE Editor. The file extension for format information files can be either .xml or .info.
These files are used to map the text in an ASCII file to attribute values for the surface being created. For example, the first three attributes defined in the format information file generally reference the latitude, longitude and Z values for each point in the dataset.
The information provided in a format information file varies greatly depending on the task at hand and the data available. Some files may simply provide the positional attributes, while others may define additional attributes available in the source dataset (e.g., Uncertainty, Temperature).
Three sample format information files are provided with BASE Editor:
• The "xyzformatinformationfile.info" file contains only position information.
• The "xyz++formatinformationfile.info" file contains position information and optional attributes.
• The "xyz++formatinformationfile_colour.info" file contains position information and sub-values for the Colour attribute.
These files can be found in the SampleData directory:
C:\ProgramData\CARIS\BASE Editor\<version>\SampleData
The sample files can be used as a template that you customize to suit your data or you can create new format information files. Because they are in XML format, any text editor can be used to work with format information files, however, the ASCII Info File Editor is provided to simplify the process.
Two different types of format information files can be created:
• Elevation: This type used if opening or importing a file containing XYZ data.
• Navigation: This type used if creating a file for data containing location and time values. Navigation files are meant to be used in CARIS HIPS & SIPS only.
In addition to the file type, there is also an option for the file format. There are two different formats available:
• Fixed: A fixed format information file is used if the source data file has no delimiter between the attribute values. With this method, data is mapped according to the "Start" and "Width" values defined for each attribute column in the file.
• Delimited: A delimited format information file is used if the source data file uses a delimiter character to separate the attribute columns. With this method, the delimiter character signals the start and stop of each column of data.
The following is an example of an elevation format information file in the delimited format:
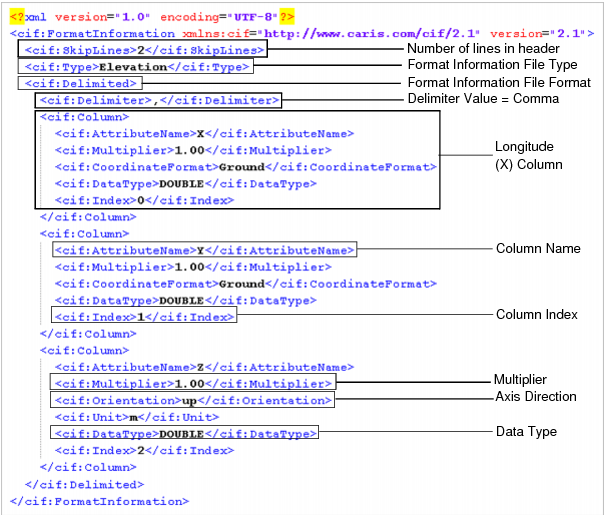
Each of the fields highlighted in the example can be defined using the Properties control in the ASCII Info File Editor. These properties, as well as those not noted in the example, are explained throughout the topic.
There are two ways to access the ASCII Info File Editor in BASE Editor:
• The ASCII Info File Editor command in the File menu or the Tools toolbar.
• The Info file field in Step 3 of the Import Wizard. When launched using this method, the Editor will be populated automatically with the selected format information file (if one was selected) and the first selected data source. See Import Wizard: Input Settings for more information.
The Editor consists of three controls:
• File items, which provide a tree structure of column items that represent each of the attributes in the data source. This window is used to select a column to modify its properties and to add/remove columns in the file.
• Properties, used to view and modify the settings for the column selected in the File items control.
• ASCII preview, which displays lines of data from the source file to be imported, similar to viewing the file in a text editor.![]()
When the Editor is launched from the ASCII Info File Editor command, all controls will be empty and the ASCII preview will be hidden.
Because the format information file needs to match the contents of the ASCII file, it is recommended that you have the source data displayed in the preview when defining properties.
1. [Optional] Click Show ASCII preview to expand the ASCII preview control.
Although expanded, the ASCII preview control will not be populated until a data file is selected.
This field is populated automatically when the Editor is launched from the Import Wizard. See Import Wizard: Input Settings for more information. |
2. Click the ASCII data Browse button (...) and navigate to an ASCII file.
By default, the first 100 lines of the file will be displayed. The Number of lines shown field at the bottom of the control can be used to define the number of lines displayed. 
3. [Optional] Change the value in the Number of lines shown field.
Also at the bottom of the control are information fields. These fields function like a map for the values in the source data. If you select values in the previewed data, information about those values will be displayed in the fields. The following fields are provided:
• Line: This field numerically identifies which row is selected in the file. Each line represents a point in the data. Line numbering starts at 1.
• Column: This field numerically identifies which character column of data is selected in the line. Every character in a line is considered a column and is numbered starting at 0.
• Width: This field identifies the number of characters currently selected in the preview. The width value is then used to identify the number of characters to include in an attribute value if no delimiter is used.
• Column index: This field identifies the column index number of the currently selected data. Each attribute in the source data is assigned to a column and indexed with a number starting at 0. This column contains all characters that make up the values for that attribute. This field is only available for delimited format information files.
You are now ready to create or edit a format information file.
Procedure: Create a Format Information File
To create a new, blank format information file:
1. If you have not already done so, select the ASCII Info File Editor command.
2. Click the New format information file tool.
Menu | Tools > Editors > ASCII Info File |
Tool |
|
The New ASCII Info File dialog box is displayed.
3. Select the format of file to create and the Type.
4. Click OK.
The File items control will be populated with the default column entries for the selected file type.
• For an elevation file, this includes X, Y and Z. These columns cannot be removed or renamed.
• For a navigation file, this includes X, Y and six DatagramTime entries. The X and Y columns cannot be removed or renamed. The DatagramTime columns can be removed and/or renamed, as long as one time entry is left unchanged.
For each additional attribute included in the source data, an additional item will need to be added to the File items list.
5. Click the Add button  .
.
A new item is added to the tree structure, labelled NewColumn. The name can be changed to something more specific in the Properties control either by selecting an option from the Column Name drop-down list or by manually entering a name in the field. The drop-down list contains default column names for each of the available file types. For a navigation file, "DatagramTime" is provided. For an elevation file, you can choose between "DEPTH_TPU" and "POS_TPU", both of which are meant for uncertainty data.
If a name is selected from the drop-down list, the properties associated with the attribute type will either be populated with default values or be disabled, as they are defined automatically by the selection.
6. Repeat step 5 for each column you want defined in the format information file.
The Remove button |
Next you need to define the properties for each attribute column represented in the file.
7. Select an item in the tree structure of the File items control.
The Properties control will be populated with the properties for the selected column.

These properties and their values will differ based on the item selected. If the root of the file tree is selected, you are provided with properties for the file itself. If a column item is selected, you are provided with properties for the selected column. As you select each property, a brief description is provided at the bottom of the control.
The properties are also described briefly in the table below.
Property | Description | |
Skipped Lines | This property is used to identify the number of lines in the header of the source data file. These lines will be skipped when reading the data to be imported. This value must be an integer. | |
Delimiter | This property is used to identify the delimiter character that separates the attribute columns in the source data file. The delimiter value can be selected from the drop-down list, or a single character of the user’s choice can be typed in the field (“,” , “.”, “|”, etc.). This property is only available for delimited format information files. If no delimiter is present, the "Start" and "Width" properties must be used to identify the boundaries of attribute columns. | |
Type | This property identifies the type of the format information file (Elevation or Navigation). This property is for information purposes only and cannot be changed. | |
Column Name | This property assigns a name to the selected column. This name will function as the attribute name for the data in the column when imported to a surface. The surface layer containing the data from the column will also be named according to the value entered here. Column names can be defined as any text string, or selected from the drop-down list. Names in the drop-down list cannot be changed, nor can the default names for the X, Y, and Z columns. | |
Column Index | This property is used to assign a column index number to the selected attribute column in the source file. Using the column number specified in the format information file, an import tool assigns the values in the column to the appropriate attribute for each line. This property is only available for delimited format information files. | |
Column Multiplier | This property is used to scale the data during import. Coordinates need to be in the same unit as expected for the coordinate reference system (CRS) specified for the input. If the ASCII file contains coordinates and elevations in feet, for example, but the input CRS is defined as having coordinates and elevations in metres, it is necessary to apply a scaling like 0.3048 to both X and Y columns to have the data be positioned correctly and to the Z column for correct elevation values. Any number is accepted for this value and a different scale can be specified for each column. If no scaling is required, leave the default 1.0. | |
Data Type | This property identifies the type of data in the selected attribute column. This property cannot be changed for default X, Y or Z columns. See Additional Attributes for more information on the available data types. The following data-types are available from the drop-down list: | |
• FLOAT • DOUBLE • SHOR • USHORT • INT • UINT • UCHAR • TIME_HOUR • TIME_MINUTE | • TIME_SECOND • DATE_YEAR • DATE_MONTH • DATE_DAY • STRING • COLOUR_RED • COLOUR_GREEN • COLOUR_BLUE • COLOUR_ALPHA | |
Coordinate Format | The format of the coordinates for the file. This property is only available for the X and Y columns. The options include: • DecimalDegrees • DegreesDecimalMinutes • DegreesMinutesSeconds • Ground | |
Start/Width | These properties are used to identify the data boundaries for each attribute column when a delimiter is not used. These properties are populated with the character column count for the characters in each line. The Start value would be the column number of the first character in the attribute value. The Width is the number of characters that make up the value. The first character in a line always has a Start value of 0. If the first attribute value contained 11 characters, then it would have a Width value of 11. The Start value of the next attribute would then be the next consecutive number in the line, which in this case would be 11 (if all characters in the value are to be included during import). This numbering is continued across all character columns in the line. These properties are only available for Fixed format information files. See Standard Attributes for more information on fixed data. | |
Axis Direction | The convention for the positive Z-axis. | |
Unit Type | The type of measurement values in the data. This field is used solely to filter the available entries in the Unit property; it is not actually used in the format information file. | |
Unit | The unit of measure of the data. The options in this field can differ based on the selected Unit Type. | |
Subset | This is a set of properties used to define settings for an attribute in delimited data that contains sub-values, such as dates, times, colours, etc. When using subsets, each sub-value has a separate column index number and a different column name. The following properties are available for subsets: | |
Subset: This property is used to indicate whether the selected attribute has sub-values or not. The property is defined as True if the entry represents a subset of a delimited field. | ||
Subset Start/Subset Width: These properties are used to define the Start and Width values of each sub-value in the selected column. The count for sub-values is similar to the count for a line in fixed data, except that the count starts with the first character in the attribute value, which is always 0. The Width value is the number of characters in the sub-value. These fields are only enabled if the Subset property is True. If working with delimited data, but the sub-values are not delimited, the same Column Index must be used for each sub-value. If the sub-values are delimited, there is no need to use a subset - each sub-value can be entered normally. | ||
Ignored Values | This property is used to indicate values that are to be ignored by an import tool if the data contains invalid values (e.g., points without elevation values). When an import tool encounters an ignored value, it will skip that point and move on to the next one. Any number or string can be entered for this property. Populating this field will add another empty “Ignore” field underneath it, allowing multiple values to be entered. If the source data has multiple representations of an invalid value (such as 0, 000 and 0.0), each representation must be reflected in the format information file, as the values are treated as strings. | |
For more details about these properties and defining additional attributes, see Working With Format Information Files.
8. Define the properties of each column as needed.
9. Click OK to define a name and location for the new file.
At this time, the file will be validated against the XSD schema file located in:
C:\Program Files\CARIS\BASE Editor\<version>\modules\BASE Editor\support\Schemas\CARIS\cif\2.1
If any settings in the file do not conform to the standards defined in the schema, an error message will be displayed. If the file passes validation, it is now ready to use with an import tool.
Procedure: Edit a Format Information File
To edit a format information file:
1. Launch the ASCII Info File Editor.
Menu | Tools > Editors > ASCII Info File |
Tool |
|
2. Click Open  and select a format information file to edit.
The Editor will be populated with values for the selected file. The file tree lists the columns present in the file.

3. [Optional] Click Show ASCII preview.
4. [Optional] Click the ASCII data Browse button (...) and navigate to the source data for the format information file.
5. [Optional] Change the columns included in the File items list:
• Use the Add button to add new items to the list.
• Use the Remove button  to remove selected items from the list.
6. Select a column in the File items list.
The Properties control will be updated with values for the selected column.
7. Adjust the properties for the column.
8. Repeat steps 6 and 7 for each column as needed.
When all changes have been completed, the file needs to be saved.
9. Click Save  to save the changes to the open file.
OR
Click the Save As  button and define a name and location to save the changes to a new file.
As mentioned above, the file will be validated against the XSD schema file when it is saved. The format information file is now ready to use with an import tool.


