Pop-up | Line Digitizer > Geodetic Arc [CCW] Area Digitizer > Geodetic Arc [CCW] |
Pop-up | Line Digitizer > Geodetic Arc [CW] Area Digitizer > Geodetic Arc [CW] |
Use with the Create Line Feature or Create Area Feature command.
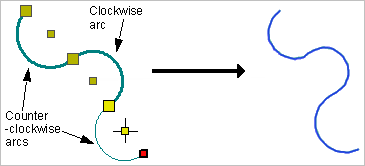
A geodetic arc can be clockwise or counter-clockwise.
When digitizing a geodetic arc as part of a larger line, the radius point of the geodetic arc is the most recent point of the line.
Related commands:
Procedure: Counter-clockwise
Create a counter-clockwise geodetic arc.
1. Select the Digitize Geodetic Arc [CCW] command.
2. Click on a point on the radius of the arc (1).
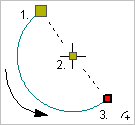
3. Click on the centre point of the arc (2).
4. Press and hold the left mouse button and drag the cursor to the desired length and direction of the arc (3).
5. Release the mouse button.
You can click directly on point 3 but pressing and dragging will give you a preview of the arc. |
6. Repeat as necessary to add more counter-clockwise geodetic arcs.
7. End or close the line.
Pop-up | Line Digitizer > End Line Line Digitizer > Close Line |
Key | <End> <Home> |
Close line joins the first point in the line to the last point.
The new line feature is created.
Procedure: Clockwise
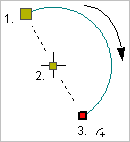
Create a clockwise geodetic arc.
1. Select the Digitize Geodetic Arc [CW] command.
2. Click on a point on the radius of the arc (1).
3. Click on the centre point of the arc (2).
4. Press and hold the left mouse button and drag the cursor to the desired length and direction of the arc (3).
5. Release the mouse button.
You can click directly on point 3 but pressing and dragging will give you a preview of the arc. |
6. Repeat as necessary to add more clockwise geodetic arcs.
7. End or close the line.
Pop-up | Line Digitizer > End Line Line Digitizer > Close Line |
Key | <End> <Home> |
Close line joins the first point in the line to the last point.
The new line feature is created.