Key | <S> |
Key | <I> |
You can snap a vertex to an existing feature or vertex. You can also use snapping to intersect a new feature with an existing line or area feature.
Snapping alone does not change the existing feature.
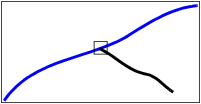
Intersecting splits the edge of both the existing feature and the new feature. In this example, the blue line is the existing line. It is split when the vertex of the black line is added.
Intersecting will not work if the feature you are intersecting with is locked by another user. |
You can also use snapping and intersecting with the Measure Distance and Angle command, but in this case, the two are the same. Features are not intersected. |
Snapping and intersecting use the following symbols to indicate the kind of vertex you are snapping to or intersecting with:
Snap/ to/Intersect with | Symbol |
Start node of an edge |
|
End node of an edge |
|
Intermediate edge vertex |
|
Nearest edge vertices |
|
Vertex |
|
Point or sounding |
|
To cycle through multiple vertices in close proximity, press <Space> several times until the desired vertex is highlighted.
You can choose to snap automatically with specific node types in the Edit Options tab of the Options dialog box.
Procedure: Snap manually
1. Press and hold <S>.
2. Press and hold the mouse button
3. Move the cursor over the feature you want to snap to.
4. Release the mouse button when the vertex you want is highlighted.
Procedure: Intersect manually
1. Press and hold <I>.
2. Press and hold the mouse button.
3. Move the cursor over the feature you want to snap to.
4. Release the mouse button when the vertex you want is highlighted.


