EIVA format, as stored in .sbd files, can store single beam, multibeam, multi-transducer and side scan data.
Since EIVA allows data logging from multiple devices, the Data Source option enables you to select the source for heading, attitude, and navigation data. The data for each device is tagged with a number (from 0 to 4), that represents one of up to five devices collecting each type of data. (If you select a number for which no device exists, no data is converted.)
Interface
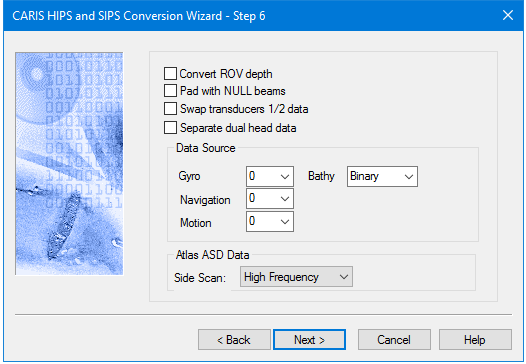
Options for converting EIVA data to HIPS are displayed in this dialog box.
Option | Description |
Convert ROV depth | Select check box to store the EIVA sub-packets as HIPS delta draft/sub-sea depth. |
Pad with Null Beams | Select check box to replace missing data with NULL (rejected) beams in the case of dual head data where the data from head 1 is missing. |
Swap transducers 1/2 data | Select check box to switch data between heads (in a dual-head setup) on conversion. |
Separate dual head data | Select the check box to keep the soundings from dual head transducer data separate and not combined into a single HIPS profile. (Soundings from transducer head #2 will be identified via status bits encoding so no changes to your vessel files are needed.) |
Data Source
| |
Gyro | Select a number specifying the heading device number. The valid range is 0 to 4.The default value is 0. |
Navigation | Select a number specifying the navigation device number. The valid range is 0 to 4.The default value is 0. |
Motion | Select a number specifying the motion device number. The valid range is 0 to 4. The default value is 0. |
Bathy | You can convert the XML portion of your Atlas ASD data, instead of the Binary (the traditional source of bathymetry data in the EIVA converter). The XML portion, if it exists, is contained within the EIVA side scan datagrams. Binary is the default source. |
Atlas ASD data | Select High or low frequency from the Side scan list. |
Procedure
1. Set options.
2. Click Next to continue conversion process.