Menu | Tools > Mosaics > Classify |
pop-up | Classify |
Classify the return-signal intensities of mosaic image groups (represented in the mosaic as pixel values) into classes. These classes are displayed in the mosaic using specific colours, set in the Image Classification dialog box.
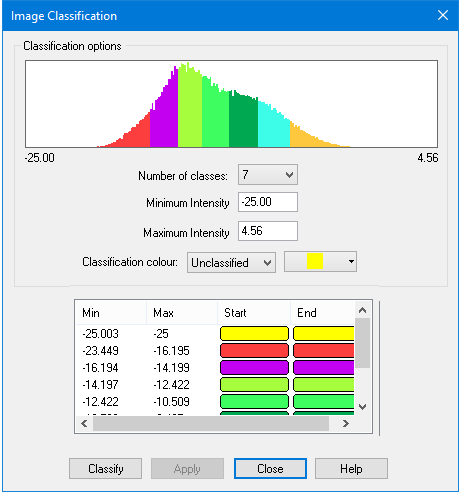
The histogram at the top of the image classification dialog box shows the distribution of pixels in the selected mosaic. The pixels represent return signal intensities. The numbers at the bottom corners of the histogram indicate the range of values in the mosaic.
Interface
A colour table is generated according to the number of classes you select. Pixels are grouped according to class starting from the minimum to the maximum pixel value. The histogram displays the pixels coloured according to the class designation. When the dialog box is closed, the intensity values in the mosaic will be displayed with these colour classifications.
Procedure
To determine the range of intensities:
1. Select the Mosaic in the Layers window.
2. Select the Classify command.
3. From the Number of classes drop-down list, set the total classes for the mosaic.
4. Set a range of values for a class by typing values for Minimum intensity and Maximum Intensity in their respective fields.
5. [Optional] Select a colour for a class by selecting a class from the Classification colour drop-down list, and the colour picker.
This colour will be displayed beside the class name.
6. [Optional] Select another colour from the colour picker, or create a custom colour from the standard Windows colour palette.
7. Repeat Steps 4 to 7, as needed.
8. Click Classify.
To save the colours and their classes to a .CRF (colour range file) for future use:
9. Click Apply.
10. In the Save As dialog box, type a name for the file and click Save.
11. Click Close.
12. Refresh the Display and the mosaic will be displayed in the colour values set in the Image Classification.