Set display properties for tiles in the Properties window. For example, you can set colours to display the progress of subset cleaning, or make the tile layer transparent so the features below it are more visible.
The Active Attribute field lists all attributes included in the tiles. When you select an attribute, such as cleaning status, tiles are displayed according to the values of those attributes.
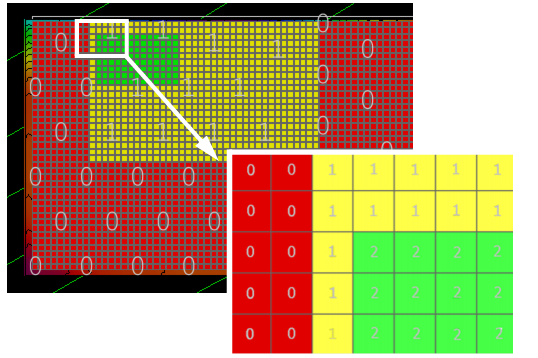
For example, if Cleaning_Status is selected as the active attribute, and the Colour fill tiles is set to “True”, the tiles will automatically be coloured as you edit, as follows:
• red, if the tiles have not been examined. (status = Incomplete)
• yellow, if the tiles are partially complete. (The tiles were only partially covered by a subset that has been marked as complete.)
• green, if the cleaning of the tiles is complete.
As well, the numeric value for the attribute status can be displayed, using the Display tile value field.
When this field is set to “True”, the tiles will display the value 0 for Incomplete, 1 for Partially complete or 2 for Completed. The example below shows tiles with “Cleaning status” set as the active attribute, and both Colour fill tiles and Display tile value set to “True”.
These cleaning status values can also be viewed in the Selection window when tiles are selected.
To set properties for the tiles layer,
1. Select a tile layer in the Layers window.
2. Open the Properties window.
The Properties window shows the display options for tiles.
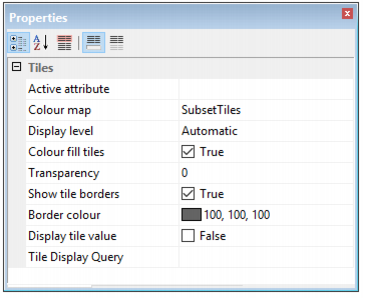
3. Select an attribute from the drop-down Active Attribute list, either Cleaning Status or Last Modified.
4. Select a colour map from the Colour Map drop-down list.
5. Change how tiles are rendered to the Display Window by selecting the Display Level, either:
• Maximum: Draw all tiles
• Automatic: Draw tiles to fit the current extent of the Display window.
The Colour Fill Tiles check box determine how attribute values are drawn in the Display window.
• If the Colour Fill check box is set to “True”, the tiles are drawn according to the selected colour map.
• If the check box is unchecked and set to “False”, the tiles are drawn in outline only.
6. Select a Transparency percentage (0, 50, 100) to make features visible through the tiles.
The Show Tile Borders check box determines how the border lines dividing the tile areas are displayed.
• If the Show Tile Borders check box is checked, the value is set to “True” and the lines are colour-coded according to the colour selected in the Border colour field.
• If the Show Tile Borders check box is clear, the value is set to “False”, and the borders of the tiles are not displayed.
7. [Optional] Select an alternative colour for the border lines from the colour picker in the Border colour field.
8. Set the Display tile value check box to “True” so the appropriate cleaning status value (0=Incomplete, 1=Partially Complete and 2=Complete) is displayed in each tile.