This procedure describes how to create and update a tiled raster product in general terms. See the descriptions of the various commands for details.
Create the product
Command: Create Tiled Raster Product
With this command, you define the product limits and set several attribute values.
The product limits is a rectangular area that defaults to the extents of the Display window when you create the product. You can manually tweak the coordinates if necessary.
The attribute values that you enter include the size of the tiles, the DPI, location, and file type of the images, the compilation scale, the coordinate reference system, and other necessary information.
Create data cover areas
Command: Create Data Cover Areas
Data cover areas are the areas of the dataset that you want to generate images for. You can skip this step if you selected the Create data coverage with same geometry option in the Create Tiled Raster Product command and you want to generate images for the entire product limits.
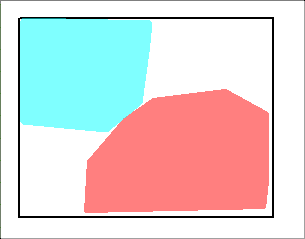
This example shows two data cover areas inside the product limits rectangle.
Create tiles
Command: Create Product Data
This command creates the tiles using the sizes you defined in the Create Tiled Raster Product command.
Review and Certify the Product
Command: Various certification commands
Before the images can be generated, the work should be reviewed. Users with the correct roles should check the tiled raster product properties and tile boundaries to ensure that the product is defined properly and that all the property values are correct.
Generate the Raster Images
Command: Export Product
Once the product has been reviewed and certified, raster images can be created. These are based on the tile boundaries, one image per tile.
If more than one usage is used to create the tiled raster product, the data in the tiles will be arranged in the order in which the usages were loaded in Product Editor, which may differ from the onscreen display. |
The names assigned to the raster image files consist of the following:
• the product name as set in the Create Tiled Raster Product command
• the coordinates of the lower left corner of the tile in Northings and Eastings, divided by the tile size
For example: ClarksIsland_52947_-78730.tif
Check for changes
Command: Compare Product to Source
The product will have to be updated if the source data changes. This command checks for changes to the source data and highlights any tiles that contain changes.
Regenerate images with changes
Command: Apply Changes to Tiled Raster Product
This command regenerates the raster image associated with the highlighted tiles.
Open and display all raster images
Command: Open Connection
This command lets you open additional HPD schemas and non-Oracle databases as background data.
You can only open TIFF files. |
To create a connection that will open all the images in a tiled raster product or any other set of geo-referenced raster images:
1. Select the Open Selection command.
2. Click Add.
The Open Connection Wizard is launched.
3. From the Formats list, select Tile Coverage.
4. Type the name and path of the folder that contains your images.
5. If you have other images in subfolders, enable Search all subfolder.
6. Click Next.
Step 2 of the wizard is displayed.
7. Click Next.
Step 3 of the wizard is displayed.
8. [Optional] Change the name of the layer.
The layer name defaults to the full path of the folder containing the images. You can click on the name and edit it if you want.
9. [Optional] Change the scale at which the tiles will be displayed.
10. Click Finish.
You are returned to the main Open Connection dialog box. Your new connection is listed with the name connection.
11. Change the connection name.
12. Click OK.
The images are opened and displayed. The connection is listed as a single layer in the Layers window.
Once you have created the connection, you can select it in the Open Connections window and click OK to display the images.