![]() CARIS HPD Paper Chart Editor
CARIS HPD Paper Chart Editor
![]() CARIS HPD Product Editor
CARIS HPD Product Editor
![]() CARIS HPD Source Editor
CARIS HPD Source Editor
Pop-up | Add Layer(s) > Filter (Layers window) |
Property | Filter (Properties window) |
The Create Layer by Filter command creates a filtered layer from the data in a background file such as a Shapefiles, GML, GeoPackage, AutoCAD and CARIS DES.
The filter expression is based on the feature object types and attributes in the data source. Only data found in the input dataset that meets the filter criteria will be displayed.
Related commands:
• • • • • • • • | • • • • • • • • |
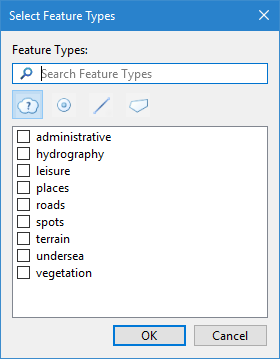
Interface: Select Feature Types
If the layer contains multiple feature types, this dialog box is displayed.
Option | Description |
|---|---|
Search Feature Types | Type a search term or phrase to search for a specific feature type. The list of feature types will be limited to only those that match the search term. Click the X button to clear the search term and display the full list. |
Command tools | Filter the list of feature types based on the feature format.
Only features of the selected format will be displayed in the list. |
Feature type list | All available feature types in the selected layer. Click the check box to include a feature type in the filter expression. |
Interface: Filter
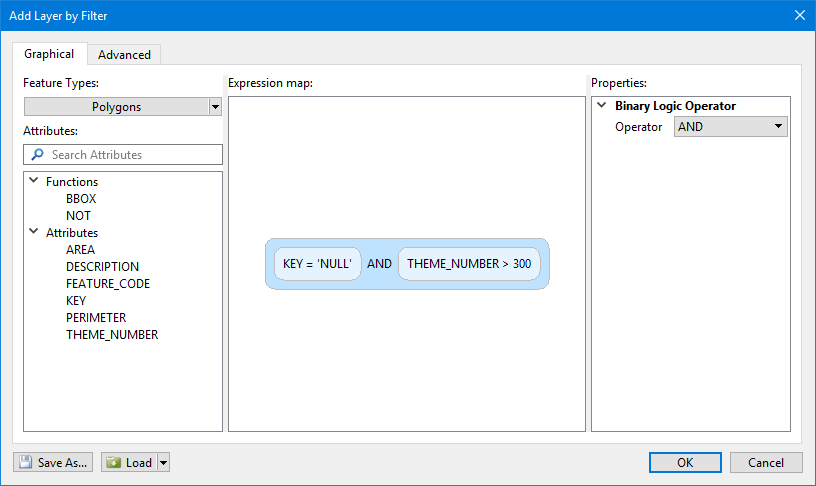 Filter
This dialog box has two tabs:
• Graphical: Build a filter expression graphically. You can select attributes, drag them into the expression map, then define properties.
• Advanced: Type a filter expression with the assistance of auto-complete options.
Expressions can be viewed and edited in either tab.
Option | Description |
|---|---|
Graphical | |
Feature Types | The feature types to include in the filtered layer. This list contains all feature object acronyms in the catalogue of the source data. 1. Click the check boxes to select one or more feature types. |
Attributes | The attributes that can be used in the filter expression. This list contains the attributes of the selected feature type. If multiple feature types are selected, only attributes that are common are listed. If the list is extensive, use the Search Attributes field to limit the attributes displayed. Type the attributes of interest. Click the X button toe clear the search and display the full list. A set of functions is used to determine how the filter expression is applied. Not all functions are available for all feature types. Some functions are: • BBOX: Bounding box. Apply the filter to all data within a set of coordinate extents. • NOT: Apply the filter to all data that does not meet the specified criteria. • ID: Apply the filter to all data with a specified feature object IDs. |
Expression map | View and build an expression map, which is a graphical representation of the filter expression. To add items to the filter expression, double-click an item in the Attributes list or click and drag an item from the list to the Expression map. To add a second item, double-click it or drag and drop it on top of the first item. A bubble is added to the map for each item selected. As items are added, additional bubbles are displayed and operators are inserted between the bubbles. |
Properties | The properties for the selected bubble or operator in the Expression map. These properties define the attribute values for the filter expression. Some properties have lists of values from which you can select, others require you to type a value. For operators, you can choose between AND and OR. 1. Select a bubble or operator in the expression map. 2. Define the properties as required. |
Advanced | |
Feature Types | The feature types to include in the filtered layer. This list contains all feature object acronyms in the catalogue of the source data. 1. Click the check boxes to select one or more feature types. |
Expression statement | View and build a a filter expression as text. When you type in the statement field, auto-complete lists are displayed if you type a function, attribute, or operator. As the expression is built, the list will change to reflect the current state of the expression and the location of the cursor in the statement. The syntax of the expression is validated as it is built. If the expression area has a red border, there is an error in the syntax; If the border is green, the expression is valid. |
Commands | Description |
|---|---|
Save As | Save the current filter expression as a 1. Click Save As. 2. Specify a name and location for the file. 3. Click Save. |
Load | Load a previously saved 1. Select file from the list or click Load and navigate to an existing file. 2. Alter the expression if necessary. 3. Click OK to apply it. |
Procedure
1. Select a vector data layer in the Layers window.
2. Select the Create Layer by Filter command.
3. If the Select Feature Types dialog box is displayed, select the desired feature types.
4. Select the Graphical tab or the Advanced tab.
5. Select the feature types to include in the filter if they are not already selected.
6. Build the filter expression.
7. [Optional] Click Save As to save the filter expression to a .filter file for future use.
8. Click OK.
A new layer is added to the Layers window, named according to the filter applied. The layer can be renamed if needed. See Layers for more information.
If necessary, the filter can be altered by selecting the Filter command again. When the Filter dialog box is displayed, it will contain the expression that was used to create the filtered layer.
 All features
 Point features
 Line features
 Area features