![]() CARIS HPD Paper Chart Editor
CARIS HPD Paper Chart Editor
![]() CARIS Paper Chart Composer
CARIS Paper Chart Composer
Menu | Edit > Change by Classification |
Colour code features by applying classifications based on attribute values.
For example, a contours classification can be set with the Value of Depth Contour (VALDCO) attribute. When the classification is applied, contours between the maximum and minimum VALDCO values are colour coded according to the classification. Attributes must contain values for classification to work.
Settings can be saved to a classification configuration file that can be opened and edited in other charts. Classification configuration files are stored in C:\Program Files\CARIS\HPD\<version>\system\RuleFiles.
Related commands:
• |
Interface
Field | Description |
|---|---|
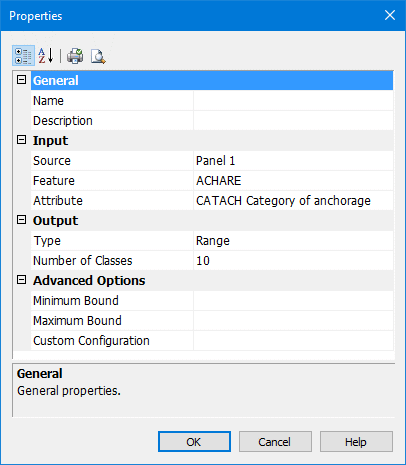
Name | Name of the classification file. Type a name if creating a new file, or, select an existing file from the list. |
Description | A brief description of the classification file. Type a description if creating a new classification. |
Source | Any layer associated with a panel in the open chart. Select a layer from the list. |
Feature | Available features in the panel for setting a classification. Select a feature from the list. |
Attribute | List of attributes associated with a chosen feature. The attribute value is used to set the colour classification for the feature. Select an attribute from the list. |
Type | List of classification types: • Range: Build a classification by equally dividing ranges into a specified number of classes. For example, if number of classes is set to 10 and there are 50 features with attribute values with the minimum value of 0 and the maximum value of 100 then ranges are created as 0-10, 10-20, 20-30, etc. Data is then fit into all classes. Each class could contain a different number of features. • Value: Build a classification by equally dividing the number of features into a specified number of classes. For example, if the number of classes is set to 10 and there are 50 features with attribute values, features are divided into 10 classes with 5 features in each. The minimum and maximum range (width) of each class is set based on the minimum and maximum values in the 50 features. This means that the ranges are not of equal width but depend on the values in the set. If the number of features is an odd number, the remainder is treated as separate class. • Unique: Build a classification based on specific attribute values. For example if you have 10 features with 10 different values for the same attribute, ten classes will be created. • Custom: Build a classification based on user-defined classes. Select a type from the list. |
Number of Classes | Classes are groups of features that are distributed according to range or value. This option is not available for the custom or unique classification types. Type a number in the field. |
Minimum/Maximum Bound | Set the upper and lower limits for classification. If these fields are left empty then the command will use to the maximum and minimum values of the chosen attributes. Type a value into both fields. |
Custom Configuration | Create a custom configuration or change colour settings for classes. Click Browse in the field. |
Procedure
1. Select a Panel Data layer.
2. Select the Change by Classification command.
The Properties dialog box is displayed.
3. Complete the properties in the dialog box (see above) and click OK.
Custom Configuration
Create a custom configuration. You can also view and change existing configurations.
1. In the Properties dialog box, select Custom from the Type field.
2. In the Custom Configuration field, click Browse.
The Custom Configuration dialog box is displayed.
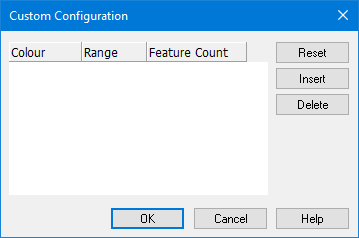
This dialog box sets ranges for attribute values and also lists the total number of features within a range.
3. To add a range, click Insert.
A row for entering range values is displayed.
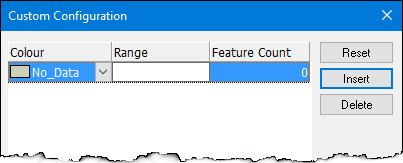
4. Select a Colour from the drop-down colour palette.
5. Double-click the Range field.
Attribute values are separated by a colon. For example, a range between 5 and 10 is written as 5:10. This means that the range includes values greater than 5 but less than or equal to 10.
6. Type the minimum and maximum values for the class using the syntax shown above.
7. Press <Enter>.
The Feature Count field displays the number of features equal to the Range value entered.
The custom class is added to the custom configuration.
8. [Optional] To remove a specific class, select the class and click Delete.
9. [Optional] To remove all classes, click Reset.
10. To finish and create the configuration, click OK.
The custom configuration is created.The classification is saved to the RuleFiles folder.