Menu | Tools > Surfaces > Filter |
Pop-up | Filter |
Create a new surface (coverage) containing nodes from a raster surface or point cloud that meet the criteria of a user-specified filter.
The new coverage will contain all of the bands present in the source coverage, but with the filter boolean expression applied to limit which nodes are populated. Typically, all bands are populated in the same areas after the filter, in locations where the values of the referenced bands pass the expression criteria.
The new coverage is created in memory only and will be lost when the application or the layer is closed. If you wish to retain the new coverage, it can be saved to a CSAR file using the Save As command. See Save As for information on the command. When the dataset is saved, a new bounding polygon will be created for the data and a Bounding Polygon layer added to the layers list.
The filter expression can be built using the operator buttons in the dialog box and values entered through the keyboard. The operators supported in the command are listed below.
Operator | Type | Function | Example |
( ) | Grouping | bracketed operation | (Depth+1) |
+ | Mathematical | addition | Depth + 4 |
* | Mathematical | multiplication | Depth * 4 |
– | Mathematical | subtraction | Depth - 4 |
/ | Mathematical | division | Depth / 4 |
^ | Mathematical | exponentiation (Depthx) | Depth ^ 4 |
< | Mathematical | less than | Depth < 4 |
> | Mathematical | greater than | Depth > 4 |
= | Mathematical | equal to | Depth = 4 |
!= | Mathematical | not equal to | Depth != 4 |
AND | Logical | conditional relation | Depth > 4 AND Uncertainty < 0.5 |
OR | Logical | conditional relation | Depth > 4 OR Density > 5 |
Multiple expressions can be combined to build conditional expressions in the form below, where each bolded part can be a full expression in itself:
If Expression then ResultA else ResultB
Conditional expressions provide the added ability to have no‑data values in the results. When no‑data values are assigned to nodes in the output, those nodes will not be displayed and cannot be selected or exported.
Conditional expressions also allow mathematical expressions in the results. This allows the attribute values to be altered differently for each result or additional expressions to be run based on the results of the first expression. Examples of both are shown below:
If expression Then (Density+12) Else (Depth+10)
If (Intensity> -46 AND Intensity< -25.4) Then 1 Else If (Intensity> -24.399 AND Intensity< -19.2) Then 2 Else If (Intensity> -19.199 AND Intensity< -14.5) Then 3 Else If (Intensity> -14.5 AND Slope > 8.51) Then 4 Else If (Intensity> -14.5 AND Slope < 8.51) Then 5 Else NO_DATA
If using the AND operator, both relations must be true for the complex expression to be true. If using the OR operator, only one of the relations must be true for the expression to be true.
To correctly enter an expression, the following rules must be followed:
• When defining conditions, if, then and else must always be entered in the order that they are specified here.
• When a part of the expression (Expression, ResultA, ResultB) contains multiple parts, each part of the expression must be surrounded by brackets.
• The correct case must be used when specifying names of 'Available attributes', for example Deep and Density.
• Always use NO_DATA to set no-data values for a node.
• When filtering a coverage based on a contributor band, and the contributor band values include file paths, the expression must be entered as the full URI.
Examples of expressions are provided below.
Scenario | Expression | Result |
Checking the depth and uncertainty values of all data on a surface. | If (Depth > 10 AND Uncertainty < 0.2) Then Depth Else NO_DATA | Each node that is deeper than 10 and has uncertainty less than 0.2 is added to the new layer using a value from the input Depth layer. All nodes that do not meet the criteria will be added to the new layer with the NO_DATA value. |
Testing a variable resolution surface against IHO Order 1a. | If (Density >= 5 AND ((Depth<=40 AND Resolution<=1) OR (Depth>=40 AND Resolution <= (0.1 * Depth)))) Then NO_DATA Else 1 | Each node that meets the criteria is added to the new layer with the NO_DATA value. All nodes that do not meet the criteria will be added to the new layer with a value of 1. |
Identifying all data in a coverage that originated from a specific contributor dataset. | Contributor='file:///C:/Surfaces/CUBE_05m_Final.csar' | All data that originated from the CUBE_05m_Final.csar coverage is saved to a new coverage. |
Creating a filtered point cloud using LAS classification data. | Classification = 'Ground' OR Classification = 'Low Vegetation' OR Classification = 'Medium Vegetation' OR Classification = 'High Vegetation' | All data classified as ground or vegetation is included in the new point cloud. |
Interface
The Filter command uses the following dialog box.
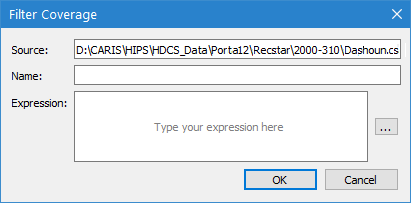
Option | Description |
Source | The source coverage to be filtered. This field is populated with the coverage that was selected at the time the command was initiated and cannot be changed. |
Name | The name to assign to the new coverage. |
Expression | The filter expression to apply to the source data. 1. Click the browse button (...) to launch the Expression Builder dialog box.
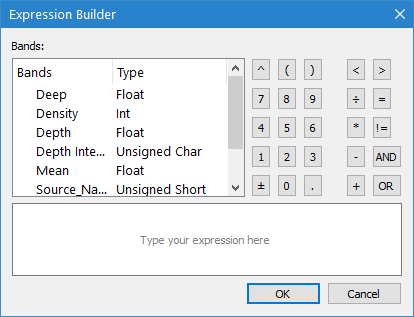
This dialog box is used to create a filter expression by typing in the expression field or selecting options from the Bands list and the operator buttons. The expression field also provides the following functionality to assist in expression creation: • Auto-complete options are displayed as you type in the expression field, based on the attributes in the source data. The arrow keys and/or the <Enter> key are used to select an auto-complete option. Entries added using auto-complete will be enclosed in quotation marks to ensure spaces and special characters in the band names do not cause the expression to be invalid. • Values that are specific to the source data, such as attribute band names, are coloured differently from the rest of the expression. • If the expression contains parentheses, selecting a parenthesis causes that character and the matching parenthesis to be highlighted, making it easier to distinguish between different levels of parentheses. 2. Double-click the name of the band that you want to filter, or type it into the expression field. 3. Use the keyboard or the buttons in the dialog box to add the operators and values to build the filter expression. 4. Click OK when finished to return to the Filter Raster dialog box. The Expression field is populated with the defined filter expression. If filtering LAS data, string values must be enclosed in single quotes in the expression. For example, to filter Classification data with the value of “Water”, the expression would be Classification = ‘Water’. |
Procedure
1. Select a raster surface or point cloud in the Layers window.
2. Select the Filter command.
The Filter Coverage dialog box is displayed.
3. Enter a Name for the resulting coverage.
4. Click the browse button (...) to launch the Expression Builder dialog box and define the expression for the filter. Click OK to close this dialog box and return to the Filter Coverage dialog box.
5. Click OK.
A new coverage is added to the layers window with the filter applied to the relevant band.
6. If needed, select the Save As command to save the coverage for future use.
Menu | File > Save As |
Pop-up | temporary dataset > Save As (Layers window) |