Subset Editor provides tools for working with the classifications imported from lidar data. The available classifications include ones defined in the LAS standard, as well as user-defined values.
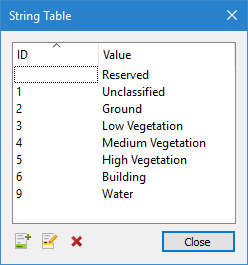
You can see the classifications in use in a given dataset through the String Table Definition property of the Classification band, which launches a dialog box listing the names of the classifications, as well as indices for standard LAS classifications. This dialog box will display only the values currently in use, which may differ with each dataset.
When working with classification values, it is useful to colour the display in the Subset View windows according to the Classification attribute. To do this:
1. Enable Subset Editor.
2. Select a subset in the Display window.
3. Select the Edit Sources layer in the Layers window.
4. Select the Attribute property under the Colour category in the Properties window.
5. Choose Classification from the list of available attributes.
The display in each Subset Editor View window is updated. The default Colour File setting is Rainbow, but a different colour map, or a user-defined colour range file can be applied.
The lidar tools in Subset Editor allow you to perform the following tasks:
• Adjust the classification of selected points.
• Manage the list of classification names, including adding and editing names.
• Remove classifications from the list if they are not in use in the dataset.
• Filter the display in the Subset View windows according to the classification values in the data.
To use classification tools, one or more point clouds with Classification bands must be open in Subset Editor.
The tools include:
Tool | Description |
| The classifications available to assign to a selection of points. The list is populated with a set of commonly used classification names that have been predefined with classification IDs. There are two methods available for assigning classifications, depending on the number of selections that will be required. If the same classification value will be assigned to several different locations, the Auto-Cursor Mode option can be used. See Auto-Cursor Mode for more information on this tool. To assign a classification to a single selection of points: 1. Using a Selection tool, select the points for which you want to assign a classification. 2. Expand the Classifications drop-down list and select the appropriate value. 3. Click the Apply Classification button. The classification value is assigned to the selected points. 4. Select the Save command to save your changes. To assign classifications to multiple different selections of points: 1. Click the Auto-Cursor Mode button to enable it. 2. Click the Apply Classification button to choose the function to be performed during selection. 3. Expand the Classifications drop-down list and select the appropriate value. 4. Using a Selection tool, select the points for which you want to assign a classification. The points are automatically assigned the selected classification. 5. Continue selecting points as needed. The classification value will be assigned to the points in each selection. |
| Click to apply the currently selected classification value to all points selected in the Subset View window. |
| Launch the Classification Visibility dialog box to add, edit or remove classifications in the string table for the Classification band and/or filter the display in the Subset Views based on classification values. This dialog box is explained in detail below. |
The Classification Visibility dialog box lists all classifications present in the current dataset. Check boxes are provided to turn on or off the display of each classification in the Subset View windows. By default, any classifications with a check mark are displayed.
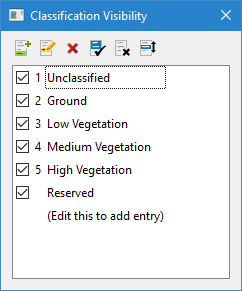
The toolbar at the top of the dialog box provides the following tools for changing the displayed classifications:
Button | Description |
| Add a new classification. 1. Click the Add Classification button or double-click the entry at the bottom of the classifications list. A blank entry is added to the end of the list. 2. Type a name for the classification and press the <Enter> key. The new classification is created and ready to use. If the classification name entered matches an entry in the list of predefined classifications, the associated classification ID will be added automatically. Custom classifications will not have an ID displayed. |
| Edit the selected classification. 1. Select a classification in the list. 2. Click the Edit Classification button. 3. Type a new name for the classification and press the <Enter> key. The classification is renamed and will be reflected in data using this classification. |
| Remove the selected classification. A classification can only be removed if it is not being used by any points in the dataset. 1. Select a classification in the list. 2. Click the Delete Classification button. A message will be displayed asking you to confirm to deletion. 3. Click Yes to continue. The application will verify that the classification ID is not being used and remove it from the string table. If the classification ID is being used, the removal will fail and an error message will be displayed in the Output window. |
| Show all classifications in the display. |
| Hide all classifications in the display. |
| Invert the visibility settings, making the selected classifications either inclusive or exclusive in the display. |